Workflows SPDesigner 2
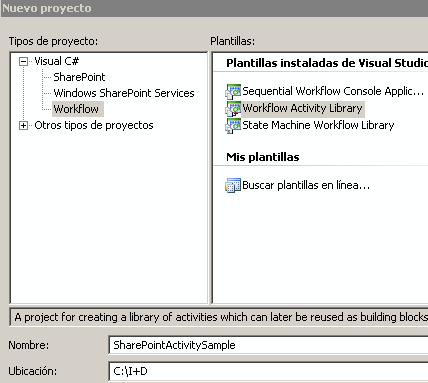
Para añadir una nueva actividad a nuestro SPD, lo primero que debemos hacer es comenzar un proyecto de Workflow, en concreto un Workflow Activity Library (Biblioteca de actividades para el flujo de trabajo).
A partir de ese punto crearíamos nuestra actividad, para este ejemplo voy a crear una actividad que consiste en enviar un texto al visor de eventos.
public partial class LogEventViewer : Activity
{

    public static DependencyProperty TextLogProperty =
        DependencyProperty.Register(“TextLog”, typeof(string), typeof(LogEventViewer));

    public LogEventViewer()
    {
        InitializeComponent();
    }

    /// <summary>
    /// Valor que figurará en el visor de eventos
    /// </summary>
    /// <value>Texto</value>
    [Description("Texto que saldrá en el visor de eventos")]
    [Category("User")]
    [Browsable(true)]
    [DesignerSerializationVisibility(DesignerSerializationVisibility.Visible)]
    public string TextLog
    {
        get { return (string) GetValue(TextLogProperty); }
        set { SetValue(TextLogProperty, value); }
    }

    /// <summary>
    /// Ejecución de la actividad
    /// </summary>
    /// <param name=”provider”>Contexto de ejecución de la actividad</param>
    /// <returns></returns>
    protected override ActivityExecutionStatus Execute(ActivityExecutionContext provider)
    {
        EventLog eventLog = new EventLog(“Workflow”);

        eventLog.Source = “SharePoint Workflow”;

        try
        {
            eventLog.WriteEntry(TextLog, EventLogEntryType.Information);
        }
        finally
        {
            eventLog.Dispose();
        }

        return ActivityExecutionStatus.Closed;
    }
}
Lo primero que hacemos es declarar una propiedad dependiente del flujo de trabajo llamada TextLogProperty, a través de la cual pasaremos el texto que deseamos visualizar en el visor de eventos.
La propiedad interna de la actividad será TextLog, esta propiedad interna obtiene y establece el valor desde la propiedad dependiente del flujo de trabajo.
Solo nos queda el método Execute, que será el encargado de realizar el trabajo de visualizar el mensaje en el visor de sucesos.
Una buena práctica es que las actividades incluyan un Validador, que yo he omitido en el ejemplo pero que es altamente recomendado aunque no sea obligatorio, ó si queremos usar la actividad con el diseñador de Visual Studio.
Una vez tenemos nuestro ensamblado, podemos probarlo primero (otra buena práctica) creando una aplicación host de workflow.
Por último tras asegurarnos que nuestra actividad funciona correctamente, debemos instalarla en el GAC en nuestro servidor de SharePoint. Y debemos editar el archivo web.config para incluir nuestro ensamblado en el apartado siguiente
 <System.Workflow.ComponentModel.WorkflowCompiler>

   <authorizedTypes>

       ……

     <authorizedType Assembly=”IdeSeg.SharePoint.Workflow.Activities, Version=1.0.0.0, Culture=neutral, PublicKeyToken=3bba710be857fdc1″

                     Namespace=”IdeSeg.SharePoint.Workflow.Activities”

                     TypeName=”*”

                     Authorized=”True” />

   </authorizedTypes>

 </System.Workflow.ComponentModel.WorkflowCompiler>
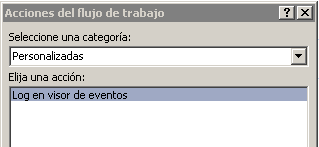
Ahora hemos de modificar el archivo WSS.ACTIONS que vimos anteriormente
 <Action Name=”Log en visor de eventos”
         ClassName=”IdeSeg.SharePoint.Workflow.Activities.LogEventViewer”
         Assembly=”IdeSeg.SharePoint.Workflow.Activities, Version=1.0.0.0, Culture=neutral, PublicKeyToken=3bba710be857fdc1″
         AppliesTo=”all”
         Category=”Personalizadas”>
    <RuleDesigner Sentence=”Logear el evento siguiente %1″>
      <FieldBind Field=”TextLog” Text=”este mensaje” Id=”1″ DesignerType=”TextArea”/>
    </RuleDesigner>
    <Parameters>
      <Parameter Name=”TextLog” Type=”System.String, mscorlib” Direction=”In” />
    </Parameters>
</Action>
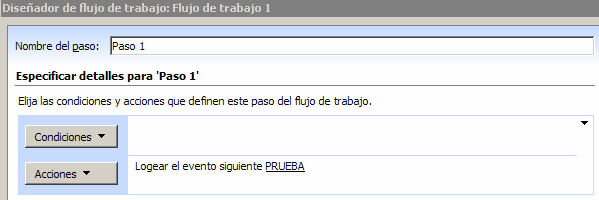
Con esto lo que hemos hecho en primer lugar es autorizar nuestro ensamblado para que forme parte del motor de flujos de trabajo de SharePoint, y en segundo lugar al añadirlo en WSS.ACTIONS le hemos indicado a SharePoint, SPD, que ahora disponemos de una nueva actividad.
Cuando usemos SPD para editar un sitio, en el momento que creamos un nuevo workflow o editamos uno existente, SPD se comunica con SharePoint y recupera el Archivo WSS.ACTIONS para a través de este configurar el asistente de flujos de trabajo. De este modo las nuevas acciones formarán parte del archivo XOML que creará SPD.
Finalmente el resultado dentro de SPD es el siguiente:
Translated
In order to add a new activity to our SharePoint Designer, first we need to begin a WorkFlow project in Visual Studio 2005, concretely, a Workflow Activity Library (Workflow activity library).
From this point we would create our activity; for this example I am going to create an activity that will send a text to the event viewer.
(code)
First, we declare a dependent property of the workflow called TextLogProperty, which we will use to pass the text that we wish to show in the event viewer.
The internal property of the activity will be TextLog; this internal property obtains and establishes the value from the dependent property of the workflow.
Then we define the Execute method, that will be the method in charge to visualize the message in the event viewer.
A good practice is that the activities include a Validador, that I have omitted in the example but that is highly recommended although not obligatory, or if we want to use the activity inside of the visual studio workflow designer.
Once we have made the compilation, we can test it first (another good practice) creating an application to host the workflow and checking the activity.
Finally, after we are sure that our activity works correctly, we must install it in the GAC in our SharePoint server. And we need to modify the Web.config to include our assembly in the following section:
(code)
Now we need to modify the file WSS.ACTIONS that we saw in the first article in order to add our new action
(code)
What we have done in the first place is authorize our assembly so that he is now an integral part of the WorkFlow engine of SharePoint, and secondly, adding it to the WSS.ACTIONS file, we have indicated to the SharePoint Designer that we have added a new activity.
When we use SharePoint Designer to publish a site, at the moment that we created a new workflow or we published an existing one, he communicates with SharePoint and recovers the File WSS.ACTIONS to configurate the assistant of the WorkFlow.
In this way the new actions will be part of the file XOML that the SharePoint Designer will create. Finally the result within the SharePoint Designer will be as follow: